MGH Angel 001: Difference between revisions
No edit summary |
No edit summary |
||
| (23 intermediate revisions by the same user not shown) | |||
| Line 1: | Line 1: | ||
{| class="wikitable floatright" | |||
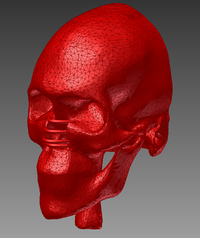
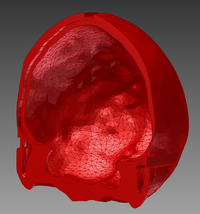
|+ Front and back halves of the skull part | |||
|- border="0" | |||
| [[File:Angell001 skull front.png | 200px | thumb | right]] | |||
| [[File:Angell001 skull back.png | 200px | thumb | right]] | |||
|} | |||
{| class="wikitable floatright" | |||
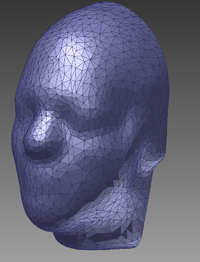
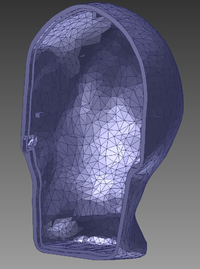
|+ Front and back halves of the outer compartment | |||
|- border="0" | |||
| [[File:Angell001 outer front.png | 200px | thumb | right]] | |||
| [[File:Angell001 outer back.png | 200px | thumb | right]] | |||
|} | |||
=== Citation === | |||
Bastien Guérin, Jason P. Stockmann, Mehran Baboli, Angel Torrado-Carvajal, Andrew V. Stenger and Lawrence L. Wald (2015). "[http://onlinelibrary.wiley.com/doi/10.1002/mrm.25902/abstract Robust time-shifted spoke pulse design in the presence of large B0 variations with simultaneous reduction of through-plane dephasing, B1+ effects, and the specific absorption rate using parallel transmission.]" Magnetic resonance imaging, DOI: 10.1002/mrm.25902. | |||
=== Download files === | |||
Download the latest version of the STL and Inventor files [https://phantoms.martinos.org/images/d/de/Stl_and_inventor_files.zip here]. | Download the latest version of the STL and Inventor files [https://phantoms.martinos.org/images/d/de/Stl_and_inventor_files.zip here]. | ||
=== Phantom description === | |||
This phantom was created based on the automatic segmentation of a human subject. Surfaces were created using the marching cube algorithm ("isosurface" function in Matlab) and were simplified using Meshlab ("Laplacian Smooth" and "Quadric Edge Collapse Decimation" functions). | |||
The phantom consists of two nested compartments. The inner compartment is the skull, which is 3D printed as two matching parts (since bone has a low conductivity, plastic somewhat mimics this material). These parts, especially the front half of the skull, contain many complex details and therefore should be printed using dissoluble support material. The skull contain an inner compartment to be filled using a brain-like gel (this brain compartment is uniform and does not mimic the grey and white matter nor the CSF-filled ventricles). | |||
The outer compartment is an outer shell in which the skull compartment slides (there are 3 sliding groves and another contact in the back of the skull). When assembling the skull compartment inside the outer shell, you should make sure to add epoxy in the sliding grooves to make sure that the skull is secure inside the outer shell. | |||
=== Special considerations === | |||
This phantom contains air cavities inside the skull that produce a realistic B0 distribution. The air cavities are 3D printed inside the skull compartment, but must be sealed after 3D printing. Because of this, the front half of the skull compartment must be printed with dissoluble support material. After dissolution of the support material, seal the holes in the skull model using saran wrap and hot glue. Be careful to seal all the holes, otherwise agar gel will flow inside the air cavities when filling (there are holes on the spinal chord and in the nose area). The largest hole to seal is the nasal cavity. To seal it, cover with saran wrap sealed with hot glue (the saran wrap must be placed over the nasal plastic arcs and cover holes in the eye sockets). | |||
To seal a hole with seran wrap, follow these instructions: | |||
* Cut a piece of saran wrap roughly the size of the hole to seal, only a bit bigger. | |||
* Apply a thick filament of hot glue around the contour of the hole. | |||
* Place the piece of saran wrap over the hot glue and pres gently to ensure that you have a good seal. | |||
Note that this must be performed before waterproofing of the outer surface of the skull using the rubber spray. | |||
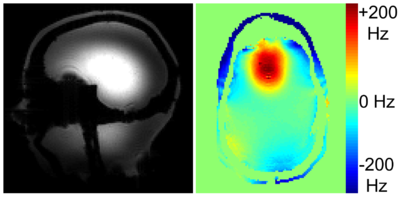
[[File:Angel 001 field maps.png | 400px|thumb|Left: Sagittal GRE 7 Tesla image of the phantom showing the characteristic dielectric resonance intensity peak inside the brain. Right: Transverse B0 map showing a large frontal lobe hotspot around 200 Hz ]] | |||
Latest revision as of 17:01, 20 October 2015
Citation
Bastien Guérin, Jason P. Stockmann, Mehran Baboli, Angel Torrado-Carvajal, Andrew V. Stenger and Lawrence L. Wald (2015). "Robust time-shifted spoke pulse design in the presence of large B0 variations with simultaneous reduction of through-plane dephasing, B1+ effects, and the specific absorption rate using parallel transmission." Magnetic resonance imaging, DOI: 10.1002/mrm.25902.
Download files
Download the latest version of the STL and Inventor files here.
Phantom description
This phantom was created based on the automatic segmentation of a human subject. Surfaces were created using the marching cube algorithm ("isosurface" function in Matlab) and were simplified using Meshlab ("Laplacian Smooth" and "Quadric Edge Collapse Decimation" functions).
The phantom consists of two nested compartments. The inner compartment is the skull, which is 3D printed as two matching parts (since bone has a low conductivity, plastic somewhat mimics this material). These parts, especially the front half of the skull, contain many complex details and therefore should be printed using dissoluble support material. The skull contain an inner compartment to be filled using a brain-like gel (this brain compartment is uniform and does not mimic the grey and white matter nor the CSF-filled ventricles).
The outer compartment is an outer shell in which the skull compartment slides (there are 3 sliding groves and another contact in the back of the skull). When assembling the skull compartment inside the outer shell, you should make sure to add epoxy in the sliding grooves to make sure that the skull is secure inside the outer shell.
Special considerations
This phantom contains air cavities inside the skull that produce a realistic B0 distribution. The air cavities are 3D printed inside the skull compartment, but must be sealed after 3D printing. Because of this, the front half of the skull compartment must be printed with dissoluble support material. After dissolution of the support material, seal the holes in the skull model using saran wrap and hot glue. Be careful to seal all the holes, otherwise agar gel will flow inside the air cavities when filling (there are holes on the spinal chord and in the nose area). The largest hole to seal is the nasal cavity. To seal it, cover with saran wrap sealed with hot glue (the saran wrap must be placed over the nasal plastic arcs and cover holes in the eye sockets).
To seal a hole with seran wrap, follow these instructions:
- Cut a piece of saran wrap roughly the size of the hole to seal, only a bit bigger.
- Apply a thick filament of hot glue around the contour of the hole.
- Place the piece of saran wrap over the hot glue and pres gently to ensure that you have a good seal.
Note that this must be performed before waterproofing of the outer surface of the skull using the rubber spray.
